Showing posts with label pies. Show all posts

Thursday, June 16, 2016

Lin's Lemon Butter


This is my dear friend (Sister) Lin Snowden - from Victoria, Canada.  I serve with this cute lady in the Family & Church History Headquarters Mission in SLC, Utah.  I'm so sad she's ending her mission to go home next week.  Then she leaves (AGAIN) on her second mission to digitize records in Barcelona, Spain this January.  We have had a great time together for the past 2+ years, and I will miss her!  Our conversations always seem to gravitate towards favorite recipes.  She shared one last recipe with me today, and told me I could post it here.  This is a recipe she used in her Tea Room that she ran before her mission.  Wish I could have been one of her customers - I'm sure it was fabulous.


Here in the United States we call this "Lemon Curd".  Not sure why - but it sounds "sour", doesn't it?  Lemon Curd typically is a bit of a pain to make.  Most recipes are very technical - instructing you to separate your eggs, strain through a sieve, etc...  But this one is a keeper because it's so very simple to make.  I don't have photos of hers - because we devoured it today.  But it is even prettier than this one (from a prior post here back in 2010 - found HERE).


Lin's Lemon Butter

6 eggs
1 ½  cups sugar
½ cup lemon juice
½ cup softened butter

Put it all in a blender to mix
Microwave for 10 mins.  It will look messy and curdled
Put in blender till smooth.


We (my tea room) used to make these in a small pastry shell, and then piped small rosettes of butter icing round the edge.


*Note:  This lemon curd could easily be used to make these two recipes - and save a lot of time in the process!


Saturday, June 27, 2015

Razzleberry Slab Pie


This piece of pie was the only one left that I could take a picture of.  I took two of these pies to the Church & Family History Headquarters Mission I serve at in the Joseph Smith Memorial Building in Salt Lake City, Utah.  (That's the reason I'm posting MUCH less lately... I'm loving my Church Service Mission)  They didn't last long.  I have to admit, this is one of the best pies I've made - and that surprised me.


I make a LOT of pies, yet I have never been able to master berry pies. Cornstarch, flour, tapioca - they all thicken a berry pie - but they don't showcase how pretty the berries are. Another disadvantage of a using these thickeners is what they do to the flavor. Heavy starches mask the fresh taste of berries.

So... enter "PIE TONE". What is it? There are two kinds - Red and Plain. Here is the difference:

Berry Red Pie Tone has been used for years in berry pies and wonderful glazes that can be used as a topping for cakes or other desserts where the red color and berry flavor is already in the mix. For use with red or darker fruits. (Think "Danish Dessert" on steroids)

Plain Pie Tone has been used for years for the same purpose. However, Plain Pie Tone is used for all other pies that require a clearer glaze. It allows for making consistent pie filling.

Where do you get it? I have only found one source. Google it, and you'll find it on the Kitchen Kneads website (kitchenkneads.com) This is the location in Ogden, Utah. I buy mine at a store by the same name, but it's located in West Jordan, Utah - unfortunately, they do not have a website.

It's a little tricky to use, but once you get the hang of it - you'll never have gloppy or soupy berry pies. Just a beautiful, perfectly textured pie filling that showcases those beautiful berries that are too expensive to waste with the wrong thickener.


Razzleberry Pie

*This recipe makes enough for two large, deep dish 9-10" double crust pies.


One 4-lb bag of frozen tri-berry mix (a mixture of raspberries, blackberries, blueberries)
1-1/2 to 1-3/4 cup sugar (more or less to suit your taste)
3/4 cup pie tone (red or plain - as desired)
1 cup water
3 cups water
Pie Crust - enough for two 9-10" double crust pies

Directions:

If using frozen berries, you'll need to allow them to thaw in a strainer over a large bowl and collect the juice.  This juice can then be used as part of the 3 cups water above.  If using the berry juice, you can get away with using the Plain Pie Tone (as it will provide extra color and flavor)

However, if you are like me - and totally forget to thaw your berries - go ahead and microwave them.  Place bag in microwave for a few minutes on high - then shake the bag and repeat until the berries are no longer frozen solid (but not hot and mushy either).  Place in strainer over a large bowl and allow juice to drain.  You may use this juice (as above) as part of the 3 cups water.

In a large measuring cup, measure 1 cup water.  Add 3/4 cup pie tone and stir until combined.  It will act somewhat like cornstarch added to water, and the pie tone will settle to the bottom if allowed to stand very long.  When it does, just stir it again before adding to the syrup in the next step.

Place the 3 cups water (use juice as part of this measurement if you wish - it makes the flavor/color better) in a saucepan.  Add sugar and stir as you bring it to a boil over high heat.  

Now add the mixture of water/pie tone, stirring well as you continue to heat.  The mixture will quickly thicken.  Bring to a boil.  Remove from heat and cool slightly before adding reserved berries.  

Use immediately in pies, or use as a sauce over cakes or other desserts.  

For this amount of filling, I made two batches of Never Fail Pie Crust and made two slab pies.  Each "slab" was baked in a half-size aluminum baking sheet.  I wish I had better pictures - these didn't last long enough to take any good ones.

Bake at 400° for about 45-50 minutes, or until golden brown.  I always add a milk, vanilla & powdered sugar glaze to drizzle over the cooled pie.  This makes it even better - ask my kids.

Wednesday, December 5, 2012

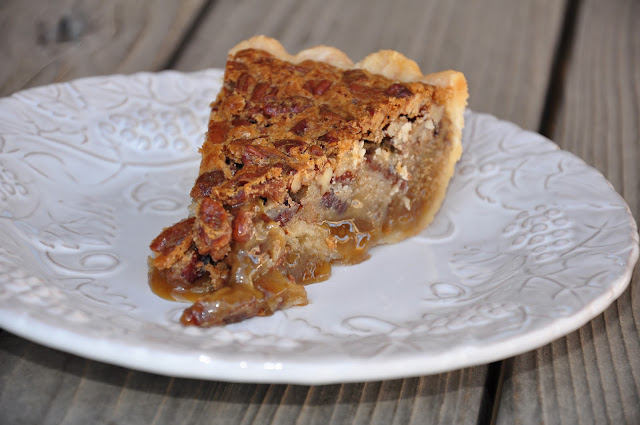
Real Southern Pecan Pie


When I saw this post for pecan pie that ISN’T runny, it got my attention.  This is one of my favorite pies, but for the life of me - I can’t figure out why it never completely sets up.  This reminds me of a VERY soft & chewy pecan cookie.  Then the fact that it’s nestled in a delicious pastry doesn’t hurt either.


I have a few favorite cooks I follow on the web, and Frieda (of friedalovesbread.com) is one of them.  She has a no-nonsense way of looking at cooking - always ready to learn and share a new tip or two with every recipe.


She obtained this recipe from a professional baker, Susan K. Payne.  She shares six tips for the perfect (Southern) pecan pie.  (Thanks Frieda!)

Number One:  Pan toast the nuts to add a nice flavor.  Number Two:  Stir with a spoon (which keeps the sugar from dissolving, which then causes the top of your pie to burn as it bakes).  

Number Three:  Fashion a pie “shield” or “fence” that will prevent the crust from browning too quickly.
  

Number Four:  Use glass pans (not metal).  Not sure why, but it works.   Number Five:  Use frozen pie crusts that you’ve pre-made for convenience.  


Number Six:  Allow the pie to cool completely before cutting.  This prevents the filling from turning runny.


We really loved this pie over Thanksgiving.  It was gone in a flash.  It’s cookie-like outer shell is just fabulous, not to mention the smooth-as-silk filling dotted with toasted pecans.  

For the recipe, go to:
www.changeabletable.com


Saturday, October 27, 2012

Caramel Apple Pie


All the flavor of a caramel apple, minus the mess - this pie is SO good.  The basic idea is to nestle the apples in a pie shell, add a lattice top, then pour a rich creamy caramel sauce over the top.  The caramel seeps down into the apples  - tenderizing them.  The lattice top is coated with caramel too.


A week ago, when the weather was still “fall-ish” - I felt my annual craving for apple pie begin.  The leaves had turned a beautiful red & gold, and I had a sack of Jonathan apples from my sister-in-law Nancy just waiting to fulfill their purpose.


This pie has been called everything from Caramel Pie, to Grandma Ople’s Apple Pie.  It has all kinds of variations, but I decided to use the same caramel sauce and put it together my own way.  I learned a few things I'll try next time I make this.


It really did turn out perfect - so delicious.  All the recipe variations out there don’t call for cinnamon - so I tossed my apples in a bit of cinnamon before turning them into the pie crust.  


Making a standard lattice crust is not worth the bother for me, so I used a handy-dandy kitchen tool called a lattice dough cutter.  It’s basically a roller with a pattern of cuts that are offset in a way that the pastry becomes a stretchy, airy lattice.  Kind of reminds me of fishnet stockings?  If you use such a tool, be sure to keep your crust cold and roll it a little thicker than normal so it won’t shred as you place it.  The only problem was I didn’t apply quite enough pressure to make the cuts go all the way through - but it still turned out well.


The caramel poured over the top was fantastic, but after - I wished I had poured about 2/3’s of it over the apples before placing the lattice on top.  Then pouring the remaining 1/3 over the top after would have contained the caramel a little better.  That would allow the caramel to seep all the way through the apples - clear to the bottom crust.  That’s my plan next time.


Be sure to place the pie on a baking sheet, just in case the caramel decides to overflow rather than seep into the apples.
  

When I took it out of the oven, the lattice top had become a firm “shell” over the top - and the apples had softened and settled, leaving an air pocket that can conveniently drink in melting ice cream, (or a little more caramel).

For the recipe, go to:
www.changeabletable.com

Tuesday, May 29, 2012

Lemon Truffle Pie


Not sure why “truffle” is in the title of this memorable pie, but doesn’t it just sound elegant? It doesn’t take a very large slice to satisfy you - it’s rich, sweet, and tart - all at the same time.  Three creamy layers keep you guessing what is in each one.  I’ve made this three times, and it doesn’t last long...


I tried this for the first time at a dessert buffet, and when I asked the cook for the recipe - I was refused.  I can’t be critical of this person, but good recipes are impossible to keep “secret”.  I guess that’s why I don’t worry about sharing my favorite recipes - it only gains you friendships.  When I see some of “my” recipes printed in cookbooks, on websites, and shared with others as “theirs” - it makes me smile.  Imitation is the sincerest form of flattery...

On the US Copyright website, it says that copyright law does not protect recipes that are mere listings of ingredients - just a substantial literary expression - a description, explanation, or illustration, for example - that accompanies a recipe or formula or to a combination of recipes, as in a cookbook.  

Do I change things up?  You bet I do - and so do all of you.  All I ask is that those who print my recipes state the source - it’s only polite.  This recipe originated in the cookbook - Lion House Pies.  An awesome resource, and I plan to learn a lot more from it in the future.

I’ve changed this recipe from the original because it’s just too heavy on the cream cheese layer.  I personally love the lemon layer - and IT should be the focus of the pie (in my opinion).  What will make you scratch your head as you enjoy it is the addition of white chocolate - it adds a depth to the pie that is amazing.  I also “stabilized” the whipped cream layer so it cuts and serves without falling apart.  
If you want the original recipe from Lion House Pies, you’ll need to buy the book (I can’t justify printing it out verbatim).  This adaptation is delicious!

You'll find the recipe here at:

Wednesday, January 18, 2012

Simple Formula for Blueberry Pie


Whenever I have fresh berries, I never know the proportions for thickening them for baking in a pie.  Blueberry seem to be the one fruit that evades me - I have never gotten it right.  I found this formula as I was scanning recipes.  It’s not really a “recipe” - but it seemed to turn out just sweet & thick enough.


For some strange reason, blueberries are EVERYWHERE right now.  Am I imagining it, but don’t they usually show up in the spring (not January)?  I’m not complaining - because I love it when they are available for a good price.  So... I had the urge to make a blueberry pie in the dead of winter!

Am I the only one that has trouble getting blueberry pie filling “right”?  It’s either too runny, thicker than frozen mud, or very bitter.  I ran across a formula that seems to take the guesswork out of it.

Resist the temptation to “fudge” on amounts here (I had about 1/2 cup extra of blueberries and just threw them in with extra water... it came out too runny)  

When I’m in a hurry, I like to make my pie without the traditional top crust.  Instead of dividing the pie dough in half for the top & bottom crust, I just roll the whole amount out into an extra large circle.  I center it in the pie pan and drape the excess over the edge of the pie pan (and there is a LOT of excess... like about 4” over the edge).  
After filling it, I then make accordion folds around the outer edge as shown.  It looks hard, but it’s very simple.  No venting of the crust is needed - as it has one large vent in the center.  This is called a “galette” - or a very INformal, rustic style of pie.  I really like it because it’s extra fast.  You’ll see these baked “free-form” on a baking sheet - but I like mine in a pie tin to keep it from oozing as it bakes.


For two other recipes using this lazy “free-form” pie - check out the posts on Lazy (Free-Form) Pie, and Plum Galette/Crostata.
Grab those blueberries before they go into hiding again until spring.

For the proportions & full recipe - go to:

.  

Friday, November 11, 2011

Beginner's Quiche


Most of us think of quiche as French - but it’s origin is actually German. It began with a bottom crust of bread dough, but then evolved into pastry.  It became popular in England in WWII, probably because meat was scarce.  This basic “beginner’s” quiche is a good place to start experimenting to come up with a unique version all your own.

Quiche hasn’t been taken seriously as great comfort food until recently.  It seems that most of us dismiss the possibility of serving quiche for a meal because of the dreaded pie crust/pastry.  I’ve gotten past that with “crustless” quiches - and, even though it’s always better WITH a crust - it’s still a great spur-of-the-moment meal.  

Quiche is usually made with a combination of eggs, liquid, and cheese.  This forms a filling that gives some kind of structure so the pie will hold together when sliced.  The formula that usually does the trick is about a cup of some kind of dairy product (milk or cream - or a combination) with 3-4 eggs.  As the eggs cook, they set - forming the custardy filling you expect in a quiche.  

Another advantage of serving quiche is that it’s simple to hide odds & ends (ummm - “leftovers”?) into it without being too obvious.  Baked in a new dish, I’ve rarely had objections from my family.

Quiche is always a good idea.  But it’s even better served with warm bread of some kind (cornbread, breadsticks, rolls, etc), a fresh green or fruit salad, and (for those “real men don’t eat quiche” guys) even a side of soup.

This recipe is the one I begin with - and it turns out different every time.

For this easy-to-adapt beginner's recipe, go to:

Wednesday, October 5, 2011

Apple Pie Bites


Fall must be sinking in around here because apples are on my mind 24/7.  Sometimes I just want a little bite of apple pie - not an entire slice.  Even though these look like they could be more complicated than a pie - they are fast to wrap up and they bake quickly. Simply apples, cinnamon sugar, & pastry.


A few weeks ago I was browsing on Pinterest and (thought) I spotted an idea similar to this.  Then the phone rang, someone else used the computer, and I could never find it again.  I searched in vain - so I had to recreate the picture I had in my mind from that quick glance.


The idea was simple - it looked like some kind of dough wrapped in a circular fashion around an apple slice.  But what dough?  Puff pastry?  Pie crust?  Biscuit dough?  I’ll never know.  


I experimented with my two favorite pie crust recipes.  I discovered that Buttery Pastry Crust doesn’t work as well when your kitchen is warm.  So I used my go-to pie crust for all occasions - Never Fail Pie Crust (recipe is HERE).  


I rolled it out the way I’ve always done - between two sheets of plastic wrap on a dampened countertop to keep it in place.  Then I lifted the top sheet off, folded the ragged edges of dough on top of itself to straighten it out, and gently rolled again.  It didn’t take much effort to roll an even rectangle.  After some trial & error - I found the ‘magic’ dimensions to avoid wasting dough and adequately wrap around a large apple slice.  


I made these to take to a care center as a treat.  We were helping with a Relief Society meeting where they were assembling hygiene kits for the LDS Humanitarian Center.  These women - (mostly in their 80’s and 90’s) love apples, but fresh apples are too crunchy for them.  We thought these would be great with apple dip.  


These are sweet little bites of tender apple, sprinkled with just enough cinnamon sugar.  


The pastry holds them together, they are simple to dip, and a little drizzle of glaze makes them even better.


For the detailed recipe, photos, and instructions - go to:
www.changeabletable.com