Showing posts with label entertaining. Show all posts

Wednesday, June 22, 2016

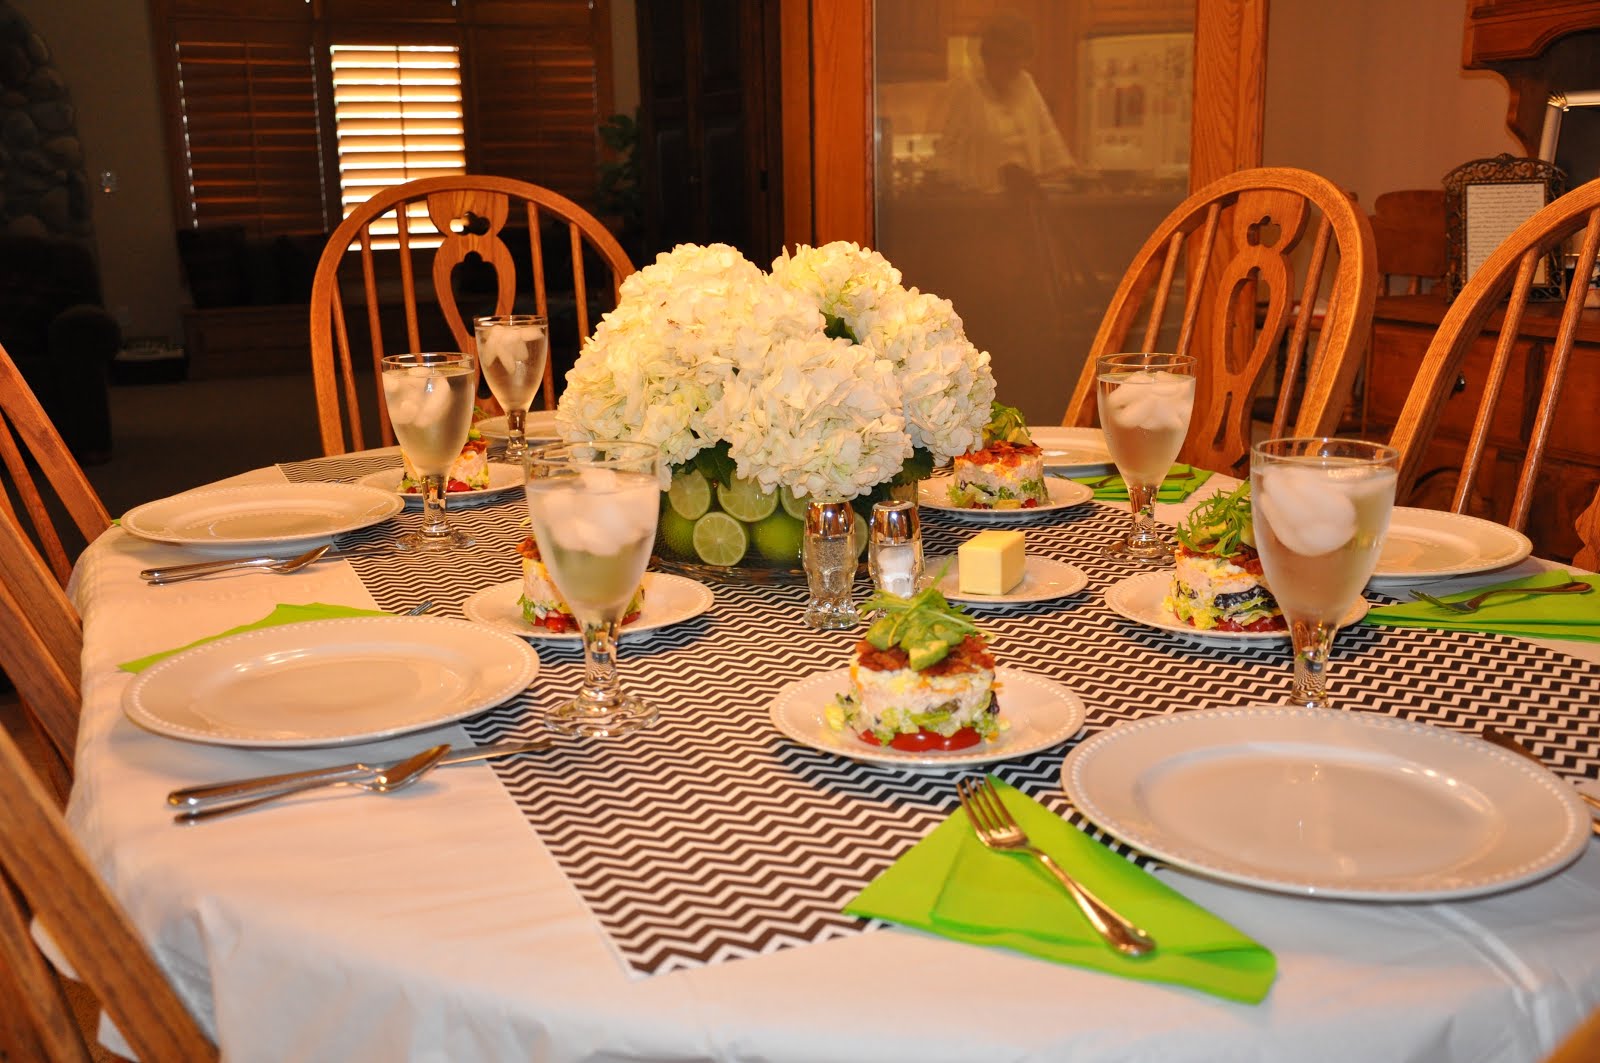
Stacked Cobb Salad


The fun technique of stacking can make healthy green salads look elegant.  You can purchase food rings, which are a fun little gadget - if you’re into gadgets.  


However, you can accomplish the same thing by using a simple tin can with both ends removed, then use something to press down the ingredients gently as you layer them in.  

A few tips for stacking:
  • Pay attention to the colors and textures of your layers. It’s nice to use colors that contrast with what you are plating your salad on.
  • Decide the order you will stack your salad ingredients.  The texture of each ingredient adds interest also.  Dice, slice, or fan out your ingredients to make them look more interesting.
  • Dressing (in small amounts) will help some items hold together a little better.  Lettuce almost always needs a little something to keep it from falling apart.
  • The size of your plate needs to be large enough so when you start to eat the salad, it will hold the avalanche of goodness.  
  • Press each layer down gently as you assemble your salads. “Tamping” the food into layers helps it stand at attention until you eat it.
  • It’s important to lift the ring straight up when you take it off.
  • If it all falls apart, so what?  It will still look beautifully layered and mounded in the center.  

This is what I used in this version of stacked salad:

Halved cherry tomatoes
Diced romaine tossed with just enough ranch dressing to hold it together
Rotisserie Chicken Salad (recipe follows)
Grated cheddar cheese
Chopped hard cooked egg
Roughly chopped crisp bacon
Diced avocados
Arugula (or other greens with a fun texture)


Rotisserie Chicken Salad
  • 1 cup mayonnaise 
  • 4 teaspoons apple cider vinegar 
  • 5 teaspoons honey 
  • 2 teaspoons poppy seeds 
  • 1/2 teaspoon garlic powder 
  • 1/2 teaspoon onion powder 
  • salt & freshly ground black pepper 
  • 3-4 cups rotisserie chicken breast, diced 
  • 3 stalks celery, finely diced
  1. In a bowl, combine mayonnaise, vinegar, celery, honey, poppy seeds, garlic powder, onion powder, salt, and pepper. Refrigerate until ready to dress the salad. This can be prepared up to 2 days ahead.
    Place diced chicken breast in the bottom of a large bowl. Gently toss with dressing.  


    Serve with fresh fruit, soup, and rolls.


    And... if you’re looking for an inexpensive, easy way to set your table - all you need is a roll of wrapping paper, a disposable tablecloth, bright napkins, transparent tape, limes, hydrangeas, and a large glass bowl.  Follow the steps below and see how fresh your salads look on a no-stress table design.


Monday, November 24, 2014

Breakfast Burritos


My LDS Ward is hosting a Christmas Breakfast in a week.  We've been trying to come up with something warm, filling, and SIMPLE to serve.  Oh... and also delicious.  

My daughter Aryn made these Breakfast Burritos for her family reunion last fall.  She made them ahead of time and froze them.  The day they left for their reunion, they threw them in the cooler and they doubled as ice to keep everything else cool.  Genius, wouldn't you agree?

She didn't really have a recipe, so we talked it through over the phone and I did a trial run a week ago.  With a few adjustments, they will be perfect.  We only have to make 200!

There are 3-4 of us making these this coming Friday.  That's only 50-70/each.  The dozen I made were a cinch.

Breakfast Burritos

Ingredients:

1 dozen Burrito-size flour tortillas
14 large or extra-large eggs, beaten
12-oz breakfast sausage - cooked, crumbled, and drained
1/2 cup sour cream
3 cups grated cheese, any variety (converts to about 12 oz)
Salt & pepper to taste

Directions:

Cook & drain sausage.  Set aside.  Do not reserve drippings.  Beat eggs well.  Melt about 2-3 Tbs butter in skillet, and heat until sizzling.  Pour in eggs and scramble by stirring gently with a non-stick spatula.  

When most of the egg is formed and lumpy, but NOT dry - remove from heat quickly.  The eggs should still be very moist and almost runny.  At this point, add the sour cream and gently combine.  (You may think the eggs will be this way when you serve the burritos, but the baking time in the oven finishes them perfectly.  The sour cream helps the eggs retain their moisture, and also adds flavor.)  Now add the crumbled sausage, and gently mix in.  Season with salt & pepper if desired.

Spread mixture evenly in the bottom of the same skillet and divide with your spatula into fourths, as you would cut a pie into quarters.  Each 1/4 of this egg/sausage mixture should make three burritos.  This will help you portion correctly.  

Place a square of foil on counter, then position a tortilla on top.  Top with egg/sausage mixture right down the middle as shown, leaving room to fold in the sides.  Now sprinkle with 1/4 cup of grated cheese.


Fold in the sides, and begin rolling at one end, as shown.  Tuck the egg mixture in as you go.  When you finish rolling, position the burrito diagonally.  Wrap as shown.  Place each burrito seam-side down, with foil end tucked under.  You should be able to fit about 24 on a baking sheet.


Refrigerate until needed, or freeze.  They can also be baked immediately.  

Bake unrefrigerated burritos at 325° for about 25-35 minutes, checking 10 minutes before finish to make sure they are not burning on the bottom.  Cheese should be completely melted and egg mixture steaming.

Cooking time will vary for frozen burritos.  These may also be microwaved for a quick morning meal on the run.

Serve immediately with salsa, sour cream, even ketchup.  Any condiment you prefer makes a good side - even sautéed onions and green peppers.  


Thursday, October 30, 2014

Silky Smooth Chocolate (and/or) Pumpkin Mousse


While looking for a delicious dessert for a Fall Dinner, I ran across two mousse recipes that I thought would be wonderful "layered" in a 9-oz clear plastic drink cup.  After trying both, I've decided it was unfair to combine them, when each is stellar by itself.


Drink cups (by Solo) are a great substitute for cut glass when you are serving a crowd.  The 9-oz size lines up neatly on a baking sheet for storing in the refrigerator to chill.


Just a few random mini chocolate sprinkles top either mousse off nicely.


The texture of each recipe is smooth and silky.  I filled each cup about 2/3's full.


As you can see, the Pumpkin Mousse didn't make it to photography.  Sorry about that.  But you can still see the texture.


You can layer the two varieties by using a large pastry bag fitted with a large open star tip.  Easy to portion this way.

Other 'garnishes' could include gingersnap or Oreo crumbs, Pirouette Cookies, and whipped cream (dusted with cocoa or cinnamon).

Easy Chocolate Mousse

2 eggs
1/3 cup granulated sugar
2-1/2 cups cold heavy cream
6-8 oz good quality semi-sweet chocolate chips

(I used my blender to make this even easier).  Place eggs and sugar in blender and combine on low speed until whipped.  Meanwhile, heat 1-1/4 cups of the cream in the microwave until hot, but not quite boiling (watch carefully, as the boiling point happens in a hurry).  Pour into blender jar gradually while on lowest speed.  

Some people feel the eggs should be cooked thoroughly, although the hot cream does a nice job of doing that.  If you wish, remove from blender to a heavy saucepan and stir over lowest heat possible until the mixture thickens (but do not boil).  At this point, add back to blender jar.

Add the chocolate chips, and blend on low speed until melted.  At this point, you may wish to add vanilla, mint, and/or almond extract for a little extra flavor (depending on your chocolate chips).

Pour into a bowl, cover with plastic wrap, and place in refrigerator until cooled.  Don't wait too long, or it will be difficult to combine with the additional cream.

Just before removing chocolate mixture, whip remaining 1-1/4 cups cream in a large, deep bowl.  Fold the chocolate mixture in gently.

If you wish to pipe your mousse into individual servings, chill a few hours until partially set.  Then spoon into pastry bag fitted with large open star tip.  Pipe into about 8 portions.  Garnish as desired, cover, and chill overnight.


Fluffy Pumpkin Mousse

1 8-oz package cream cheese, softened
1 15-oz can pumpkin puree (NOT pumpkin pie filling)
3 tsp pumpkin pie spice (*see note)
1 3-oz package cheesecake flavored instant pudding mix
1 14-oz can sweetened condensed milk (NOT evaporated)
8-12 oz container non-dairy whipped topping 

In a large bowl, beat cream cheese until fluffy and smooth.  Add the pumpkin, pumpkin pie spice, and pudding mix until completely mixed, scraping the sides of the bowl a few times.

Add the sweetened condensed milk and beat again until combined.  Scrape down sides to ensure all ingredients are incorporated.

Now add non-dairy whipped topping, gently folding in until barely combined.  Do not overmix.  

Allow mixture to remain in refrigerator until partially set (about 1-2 hours).  At this point, spoon into pastry bag fitted with large open star tip.  Pipe into 9-oz cups - should make about 11.  Garnish as desired, cover, and refrigerate until serving.

Tuesday, October 8, 2013

Mini Mac 'n Cheese Cups


(We didn't have time to focus on photography... in the heat of the moment, we were lucky to get these)

This is a fun idea for either a main dish item in a buffet, or to serve as an appetizer for a party, shower, or other event.  These are a bit more “special” than regular mac ‘n cheese, but still have the same appeal for those who crave a little comfort food.  Small portions are easy to serve (and hard to resist!)


My daughters & daughter-in-law hosted a baby shower for my daughter-in-law Rachel last weekend.  I love to turn events over to them - they enjoy a challenge and an opportunity to use their talents.  (And I love the fact that it turns out beautifully and all I have to do is pay for it!)  


Since it was an evening shower, and several who were invited came straight from work - we made it a light buffet.  Plenty to choose from if really hungry, but also not too heavy if they were on their way to dinner afterward.


We served Mrs. Mecham’s Salad, mini-muffins, single serve size Key Lime Pies, and Chocolate Mousse.  (We always have to serve Orange Water too)  These little Mac ‘n Cheese Cups went well with everything else, and were easy to serve.


My daughter-in-law Rachel loves an occasional splurge of Fried Mac ‘n Cheese at Cheesecake Factory - and we wanted to serve a few of her favorites (notice the Sour Patch Kids)

I won’t lie - the Boursin Garlic & Herb Cheese was a little pricier than I anticipated.  But the flavor was marvelous.  I had my doubts as I combined everything and put it into the cups - but I was pleasantly surprised at how tasty they were.


These warm in the microwave, but don’t have the same great texture as when they are fresh from the oven.  (Microwaving is a little tricky if you use metallic muffin cup liners as I did... always remove first.)  I made them an hour before, and then kept them in a warm oven until serving.

For the recipe - go to:
www.changeabletable.com

If you're interested - here are a few things we did at the shower.  Thanks to my wonderful daughters & daughter-in-law who put their heads together (by phone & internet & Pinterest) - this turned out to be a really fun night!


Rachel loves everything BUTTERFLIES...
We had fun rounding up the butterfly LED string lights, poking butterflies into
the wheat grass pots (instructions are HERE),  and spray painting the plates we found
at DI.  We used a fun little item called Serve It Up to stack the plates into tiered stands.

Using Rachel's nursery colors (orange, purple, and pink) - I had so much fun
making this butterfly quilt.  Can't wait to see my new little granddaughter in it...
This game is self-explanatory - but it was so much fun.  

The high chair (my husband made this for our kids - it folds down into a rocking chair)
made a great place to set up the Baby Scents game.  Guessing what each baby food was
was much harder than you would have expected.
My daughter Aryn adapted one of our favorite games (Telestrations)
using baby terms.  Like the telephone game, but drawing what you pass along.
My sister sketched out (what she thought) was "Baby Blanket"
My guess?  "Diaper Pail".
We won't say what this one was...
Rachel is going to make a beautiful mother.  Can't wait.


Monday, September 23, 2013

Hot Dogs In the Crockpot (?)


Remember the hot dogs you could buy at 7-11 or other convenience stores?  The ones that slowly simmered on the heat rollers in the glass window of a hot box?  These are every bit as good (or better) and are so convenient for a crowd.  They are gently browned on the outside, tender & juicy inside.

Easy as that.  Place hot dogs in crockpot.  Cover.  Cook.


I’m sure there are some of you out there thinking this is not a classy recipe.  It isn’t.  But it’s a great one when you have a bunch of people needing a hot meal - summer or winter.  

I was in charge of my mother’s family reunion a few weeks ago - and I was supposed to come up with something warm for a main dish.  It had been raining, and nobody wanted to barbecue.  Most of us had had pulled pork WAAAAYYYY too many times this summer.  Pulled pork has been the standby picnic food for so long I can’t remember what it replaced as a trend.  

After about an hour... they're starting to plump up.
Notice there is no liquid in the crockpot?

I had seen this idea several times on Pinterest, but I was skeptical.  I didn’t want these to resemble the “boiled in water” hot dogs from my childhood.  (The ones that split wide open when they’ve simmered too long on the stove in a pot of water).  

You'll notice there are "premium" all-beef hot dogs mixed in with the el-cheap-o chicken & pork variety.
They all turned out fabulous.  The longer you cook them, the more "BBQ-ed" they look & taste.

The verdict - a BIG success!  They were not quite like those on a grill - but not bad at all.  In fact - if you overcook them, they burn on the outside just enough to convince kids that they came from the grill.  

It’s so nice to keep them warm as well.  This method (or “recipe”) is one I will use again.  Oh... and this would be fabulous for tailgating!

For the method, go to:
www.changeabletable.com


Sunday, September 15, 2013

Pineview Punch


I’m not sure exactly where this recipe originated, only that my family has been enjoying it for over 20 years now.  We call it “Pineview” Punch because we always made it on vacation when we spent a week at Pineview Reservoir.  It makes a LOT, and the “secret ingredient” makes it so refreshing when the weather is hot and everyone is parched & thirsty.


We used to have a condo in the Ogden Valley (Utah) in a beautiful city called “Eden” - and that little town is aptly named.  We spent lots of time in the pool and at the lake as a family.  


When I’ve made this for other events - everyone always asked “What’s IN this??”  It’s citric acid - available at most restaurant supply companies and also pharmacies.  I’ve also heard you can substitute Fruit Fresh (although it isn’t quite the same).  


We mix this up - 5 gallons at a time - in a large orange cooler with lots of ice.  When the ice runs out, I add a frozen milk jug filled with water and it keeps it nice and cold.  Then we make more as needed.  I keep it right next to the kitchen sink and the kids have their paper cups labeled with their names so we don’t go through so many glasses.  


This is a simple, refreshing drink that everyone loves.  I made it for the family reunion I was in charge of this past Saturday.  Always a hit.  

You'll find the recipe at:
www.changeabletable.com


Thursday, April 25, 2013

Single Serve Key Lime Pie


Key Lime Pie is one of those “ultimate” desserts that only come around every so often.  The hardest thing about it sometimes is getting it out of the pie plate without ruining it’s loveliness.  Serving it in cups allows you to see the pastel green color, the lime zest, and the delicious crust - all without mishaps!


This recipe was shared by a (new) friend who served on a Relief Society Women’s Conference committee with me.  She is one of those people I love serving with - one who says “thanks for letting me serve!”  (Those people are RARE gems!)


We decided rather than having ONE dessert for this large group, we would have each of the 10 wards bring a different dessert or savory item - all served in clear plastic cups.  This would make desserts easy to hold and enjoy as the women visited.  We found some fun mini mock-sterling (plastic) spoons and forks that looked so fun inserted in each one.


We also served items I’ve already posted here - such as:  White Chocolate Mousse, Fresh Fruit Trifles with Mint/Lime Dressing, Veggie Dipsticks, Cherry Cheesecake, and 2 versions of Chocolate Mousse.  There are a few others I will post when I get their recipes.

Our quickie photo before running everything out to the serving tables...
I had to come home and make this delicious pie-in-a-cup as soon as I could.  My family loved it!  Thanks Sally for sharing!

For the Key Lime Pie recipe - go to:
www.changeabletable.com