Showing posts with label desserts. Show all posts

Monday, September 12, 2016

Perfect Peach Cobbler


My youngest son Chal married his beautiful wife Kelsey a few months ago.  


Chal's birthday is coming right up, and Kelsey was asking him what kind of cake he would like.  He surprised us by saying he wanted Peach Cobbler.  He couldn't really say WHICH peach cobbler he likes best.  So we quizzed him... do you like it cake-ey, crunchy, lots of topping, just a little on top?  Too many questions - but he knows it when it's "perfect".  

With it being harvest season here in Utah, I finally made it to our city Farmer's Market about 1/2 hour before they closed on Saturday.  I was on a quest for great peaches.  My favorite peaches are Lemon Elberta.  Of course, everyone was sold out.   I stopped at one last stand where they had about twenty peaches sitting in the bottom of a box.  Obviously they were the rejects people had asked them to replace from the top of the boxes they bought.  They were really bruised, but they were a great deal.  (Substandard peaches hide really well in a cobbler.)  Next day, I tried this fantastic cobbler recipe I found in a Google search.  Thank you Google!

This cobbler may seem a little more complicated because it takes three separate steps - the peach mixture, the "dumpling" mixture, and the topping mixture.  But it was simpler than I thought - and even though I didn't really want to pre-bake the peach mixture before topping with the dumplings - it turned out perfect.  Tender, just a little bit 'cake-ey', and that crunchy, cinnamon sugar topping took it over the top.  

If you don't love cinnamon, that's OK.  Just reduce it (or even eliminate it - but it would be really unremarkable without it)  If you like more topping, you could double it, but we loved it as is.


Monday, August 1, 2016

Slice of Watermelon Sherbet Cake


Today is a first for me. The first time I've posted on this blog. This blog has been a great resource for me as I have spent the last 13 years learning how to make food for my growing family. Just to introduce myself, I'm Aryn, Anne's oldest daughter! I grew up in the suburbs of Salt Lake City but turned into a country girl when I moved to Idaho with my husband 12 years ago. We live in a small agricultural town and I love it! My table is always full. Full of hungry kids, endless projects, intense meal time conversations, filling meals and some dinner flops, homework, sports equipment and my ultimate goal on one of those good nights, lots of love! 

My Mom is the first one I think to call when I have any questions, especially if those questions pertain to the kitchen. When I can't talk to her, this blog is sometime the next best place for advice. I'm excited to share a few things I've figured out and that my family enjoys! 


Thursday, June 16, 2016

Lin's Lemon Butter


This is my dear friend (Sister) Lin Snowden - from Victoria, Canada.  I serve with this cute lady in the Family & Church History Headquarters Mission in SLC, Utah.  I'm so sad she's ending her mission to go home next week.  Then she leaves (AGAIN) on her second mission to digitize records in Barcelona, Spain this January.  We have had a great time together for the past 2+ years, and I will miss her!  Our conversations always seem to gravitate towards favorite recipes.  She shared one last recipe with me today, and told me I could post it here.  This is a recipe she used in her Tea Room that she ran before her mission.  Wish I could have been one of her customers - I'm sure it was fabulous.


Here in the United States we call this "Lemon Curd".  Not sure why - but it sounds "sour", doesn't it?  Lemon Curd typically is a bit of a pain to make.  Most recipes are very technical - instructing you to separate your eggs, strain through a sieve, etc...  But this one is a keeper because it's so very simple to make.  I don't have photos of hers - because we devoured it today.  But it is even prettier than this one (from a prior post here back in 2010 - found HERE).


Lin's Lemon Butter

6 eggs
1 ½  cups sugar
½ cup lemon juice
½ cup softened butter

Put it all in a blender to mix
Microwave for 10 mins.  It will look messy and curdled
Put in blender till smooth.


We (my tea room) used to make these in a small pastry shell, and then piped small rosettes of butter icing round the edge.


*Note:  This lemon curd could easily be used to make these two recipes - and save a lot of time in the process!


Friday, November 14, 2014

Caramel Pecan Cheesecake Trifles


My neighbor JoAnn and I were trying to find a dessert recipe that was more on the unique and special side.  Our ward Relief Society was hosting a Gratitude Dinner a few weeks before Thanksgiving, and pumpkin was on everyone's mind.  Don't know about you, but in my book - pumpkin is a nice touch, but it doesn't trump cheesecake.  After several attempts, we came up with this version that was pretty amazing.  A pecan shortbread crumb layer on the bottom, delicious smooth cheesecake piped in a mound, then topped with Leatherby's Caramel and roughly chopped toasted pecans.  


Here is the recipe (pieced together from about 5-6 recipes of our own and online).  We had to make 8 batches of this recipe to come up with 65 trifles, and if you'd like to see how we did that easily in one night - be sure to read below.

Caramel Pecan Cheesecake Trifles

Crust:
1 cup flour
1/2 cup butter
3/4 cup chopped pecans

Cheesecake Layer:
1 cup powdered sugar
1 8-oz package cream cheese, softened
1 cup heavy whipping cream (measure before whipping) - we used the 40% butterfat from Costco
1 tsp real vanilla

Whip butter and add flour and pecans.  Crumble onto a large lipped baking sheet.  Bake at 350° just until golden brown (watch carefully to avoid burning).  Let stand until cool, then loosen with a spatula and crumble into a bowl.  Set aside.

Whip cream cheese until smooth.  Add powdered sugar and vanilla.  In another bowl, whip cream until soft peaks form.  Fold cream cheese mixture into whipped cream until combined, being careful not to overmix.  

Place cheesecake mixture into large pastry bag to pipe into cups.  

Measure about 2 Tbs crumb mixture into bottom of each cup.  Pipe cheesecake in a circular motion on top of crumb layer.  

Drizzle with warmed caramel sauce (purchased, or your own recipe).  Top with additional toasted chopped pecans.


We had to make 65, and decided to showcase them in the clear shortish plastic cups you can purchase in a warehouse store such as Sam's and Costco.  They were 7-oz cups, and turned out to be just the right size.  

We baked and crumbled the shortbread crust beforehand, and used a 2 Tbs measuring cup to add it to the bottom of each cup.  Make sure you don't press it down, as the cheesecake is heavy and will compact it just enough.  If you would rather use crumbs instead of chopped pecans and caramel as your topping, reserve some.  We were able to fit about 18-20 cups on a standard size aluminum baking sheet (with sides).  Then as we filled the cups with the cheesecake mixture, we covered the entire baking sheet with a large sheet of plastic wrap.  We could stack about 3 layers this way in the refrigerator to chill.  

We multiplied this recipe 8 times, and each batch yielded about 8 very generous portions.  You could squeeze out 10 per recipe if you use smaller containers.  I used my Bosch mixer and it kept the mess to a minimum.  I was able to make 4 batches in the large capacity (covered!) bowl.  First, I used the cookie paddles to blend the cream cheese, vanilla, and powdered sugar.  Then I removed the sweetened cream cheese mixture to a second bowl while I whipped the cream with the wire whisks in the same Bosch bowl.  (Being able to cover the large capacity bowl completely while whipping the cream was great - saved on spatters all over the kitchen)  At this point, I changed the whisks back to the cookie paddles - and added the cream cheese mixture back into the whipped cream.  I used the lowest speed of the mixer to then "fold" it in.  

At this point, we prepared large 14" pastry bags fitted with a large star tip.  Scoop the cheesecake mixture into the bag(s) and pipe in a circular motion around the interior of the cup.  


Thursday, October 30, 2014

Silky Smooth Chocolate (and/or) Pumpkin Mousse


While looking for a delicious dessert for a Fall Dinner, I ran across two mousse recipes that I thought would be wonderful "layered" in a 9-oz clear plastic drink cup.  After trying both, I've decided it was unfair to combine them, when each is stellar by itself.


Drink cups (by Solo) are a great substitute for cut glass when you are serving a crowd.  The 9-oz size lines up neatly on a baking sheet for storing in the refrigerator to chill.


Just a few random mini chocolate sprinkles top either mousse off nicely.


The texture of each recipe is smooth and silky.  I filled each cup about 2/3's full.


As you can see, the Pumpkin Mousse didn't make it to photography.  Sorry about that.  But you can still see the texture.


You can layer the two varieties by using a large pastry bag fitted with a large open star tip.  Easy to portion this way.

Other 'garnishes' could include gingersnap or Oreo crumbs, Pirouette Cookies, and whipped cream (dusted with cocoa or cinnamon).

Easy Chocolate Mousse

2 eggs
1/3 cup granulated sugar
2-1/2 cups cold heavy cream
6-8 oz good quality semi-sweet chocolate chips

(I used my blender to make this even easier).  Place eggs and sugar in blender and combine on low speed until whipped.  Meanwhile, heat 1-1/4 cups of the cream in the microwave until hot, but not quite boiling (watch carefully, as the boiling point happens in a hurry).  Pour into blender jar gradually while on lowest speed.  

Some people feel the eggs should be cooked thoroughly, although the hot cream does a nice job of doing that.  If you wish, remove from blender to a heavy saucepan and stir over lowest heat possible until the mixture thickens (but do not boil).  At this point, add back to blender jar.

Add the chocolate chips, and blend on low speed until melted.  At this point, you may wish to add vanilla, mint, and/or almond extract for a little extra flavor (depending on your chocolate chips).

Pour into a bowl, cover with plastic wrap, and place in refrigerator until cooled.  Don't wait too long, or it will be difficult to combine with the additional cream.

Just before removing chocolate mixture, whip remaining 1-1/4 cups cream in a large, deep bowl.  Fold the chocolate mixture in gently.

If you wish to pipe your mousse into individual servings, chill a few hours until partially set.  Then spoon into pastry bag fitted with large open star tip.  Pipe into about 8 portions.  Garnish as desired, cover, and chill overnight.


Fluffy Pumpkin Mousse

1 8-oz package cream cheese, softened
1 15-oz can pumpkin puree (NOT pumpkin pie filling)
3 tsp pumpkin pie spice (*see note)
1 3-oz package cheesecake flavored instant pudding mix
1 14-oz can sweetened condensed milk (NOT evaporated)
8-12 oz container non-dairy whipped topping 

In a large bowl, beat cream cheese until fluffy and smooth.  Add the pumpkin, pumpkin pie spice, and pudding mix until completely mixed, scraping the sides of the bowl a few times.

Add the sweetened condensed milk and beat again until combined.  Scrape down sides to ensure all ingredients are incorporated.

Now add non-dairy whipped topping, gently folding in until barely combined.  Do not overmix.  

Allow mixture to remain in refrigerator until partially set (about 1-2 hours).  At this point, spoon into pastry bag fitted with large open star tip.  Pipe into 9-oz cups - should make about 11.  Garnish as desired, cover, and refrigerate until serving.

Friday, December 27, 2013

Moist Chocolate Layer Cake with Peppermint Cream


Seems like the pumpkin phase just left us, and now it's Peppermint!  As I was putting away all the Christmas decor, it seemed such a shame to just toss the peppermint candy.  At a recent Relief Society dinner, my wonderful friend Pat (who is a fabulous caterer) served a delicious dessert.  Using a Costco American Chocolate Layer Cake, she stepped it up a notch by topping slices with whipped cream and crushed peppermint candy.  


I did a lot of searching online for a similar type of cake, and found one on King Arthur Flour website.  It guides you through a unique mixing method where the fats (butter & oil) are incorporated into the dry ingredients first, then adding the liquids and eggs.  I thought it looked interesting, and it turned out well.  A little more bother than I usually like to go to, but I would make it again. 


It is a moist, rich cake - but not overly so.  That makes it a good recipe for topping with a decadent frosting, or even dusted with powdered sugar.  It becomes more moist the longer it stands.  With a cake this size, it was in my kitchen for over 2 weeks through the Christmas holidays.  We chipped away at it, and it was more moist every time we had a little slice.  


Moist Chocolate Layer Cake  
(by kingarthurflour.com)

2-1/4 cups flour
1-1/2 tsp baking powder
1/2 tsp baking soda
1/2 tsp salt
3/4 cup unsweetened cocoa
1-3/4 cups sugar
1/2 cup butter, very soft
1/3 cup vegetable oil
1 tsp vanilla extract
1 cup milk
1/2 cup water
4 large eggs

Prepare your pans first.  This recipe works well with either of these options:  three 8" rounds, two 9" rounds, one 9" x 13" pan, or two muffin tins (24 cupcakes).  Preheat oven to 350°.

Place a fine mesh strainer over a large mixing bowl.  Measure in all the dry ingredients.  Sift/shake into the bowl to eliminate lumps (this was faster than I anticipated and worked well)


*Key to success with this recipe is having your milk, butter, and eggs at room temperature.  You can speed this up by placing your eggs in warm water for about 5 minutes, and also heating your milk briefly in the microwave (about 20-30 seconds)


Add the butter and mix at low speed for about a minute.  Now add the oil and continue mixing until it resembles coarse sand.  


Combine the water, milk, and vanilla - adding all at once to the dry ingredients.  Mix for about 1 minute, then scrape bowl and mix 30 seconds more.


Now add the eggs one at a time, scraping the bottom and sides of bowl often.  Batter will be thin.  Transfer batter to prepared pans, smoothing in the pan with an offset spatula.  For cupcakes, measure a heaping 1/4 cup into each well.  Bake about 34 minutes for 9" x 13" pan, 28 minutes for 9" layers, 24-26 minutes for 8" layers, 21-23 minutes for cupcakes.


Cake is done when top springs back when touched lightly with finger in center.   The cake will begin to pull away from the sides as well.  Allow to cool, then decorate as desired.

Peppermint Cream:  Whip heavy whipping cream until stiff peaks form.  Top slices with cream as desired, and garnish with crushed peppermint candy.  Serve immediately.

Tuesday, June 18, 2013

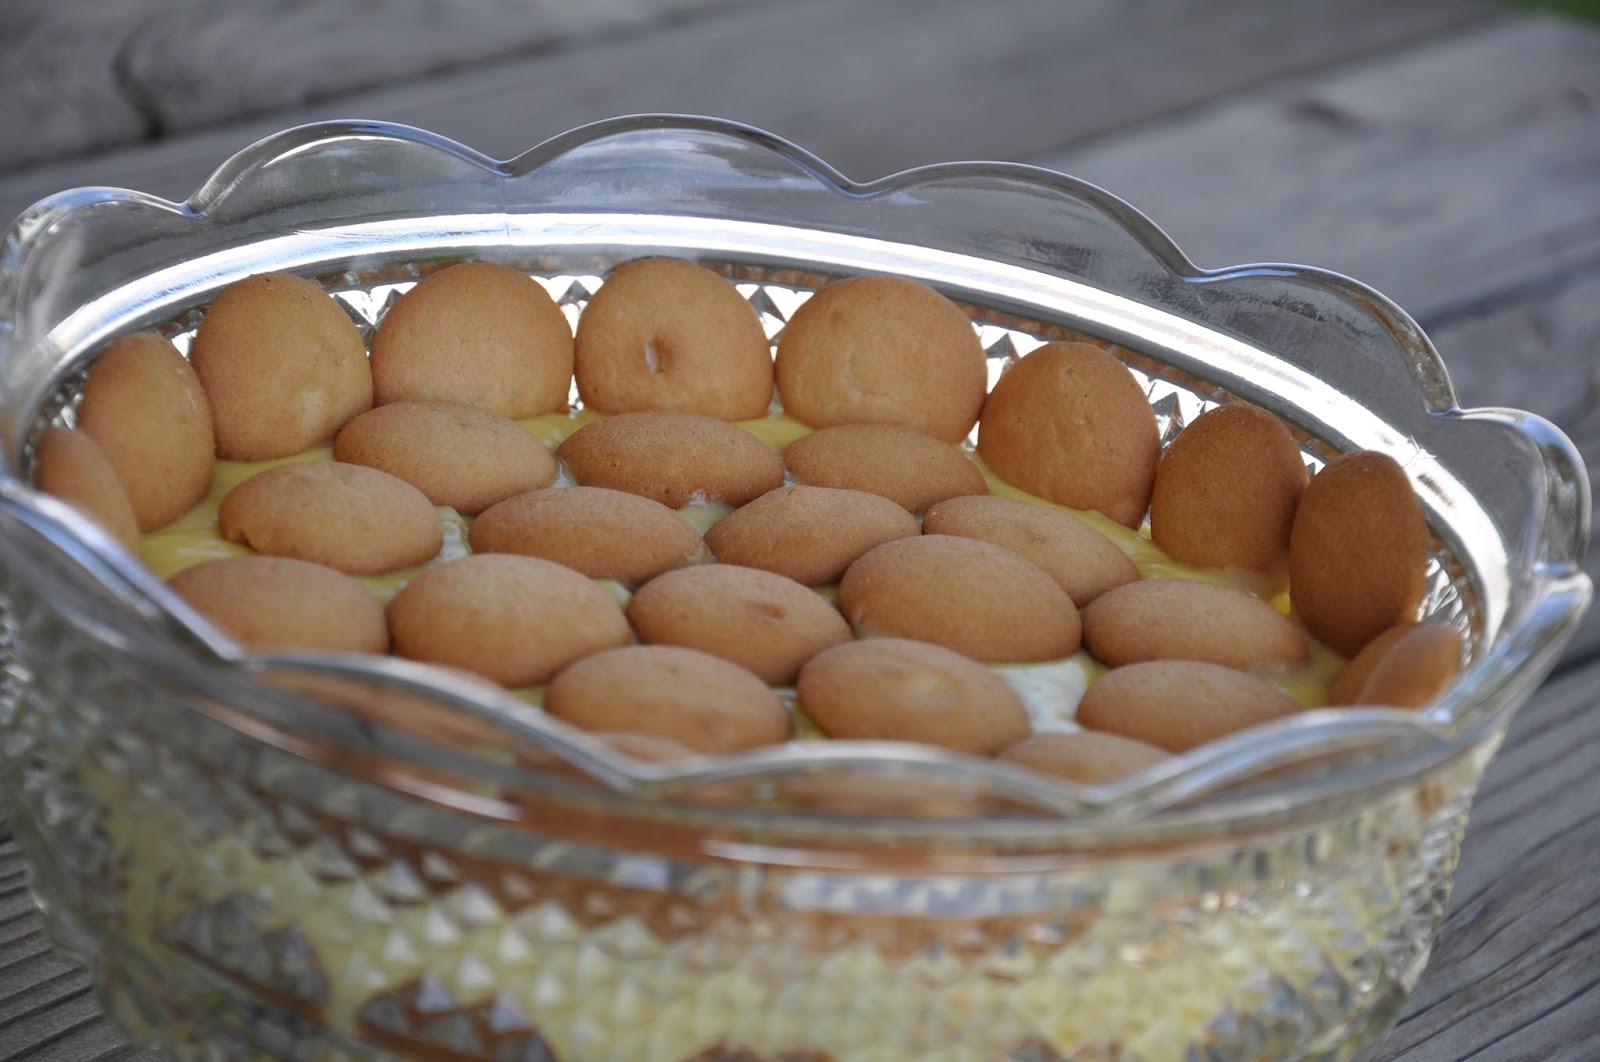
Grandpa Jay's Banana Pudding


Do you have a family recipe that can NOT be altered?  No. Matter. What?  This one is ours.  It took me years to ‘perfect’ what seemed to be a very simple recipe that came from my husband’s family.  I’ve posted this for my kids - in our own unadulterated (family) recipe language.  Compare it with your favorite version.


I’ve wanted to post this for a long time, but finally got around to it this past Father’s Day weekend.  Every one of my six children worship this dessert, but it was also my husband’s favorite.  Jay passed away almost 11 years ago this summer - and we still make his favorites and reminisce about what a wonderful husband and father he was.  


I tried to pull out a serving so I could photograph it on Sunday.  Talk about dangerous.  Like jay walking on the freeway.  


When I married into the Petersen family 36 years ago, I was clueless about their family traditions when it came to food.  This “pudding” was raved about by his family.  But to me, it resembled soggy cookies in pie filling.  I couldn’t fathom why  you would destroy a perfectly crunchy vanilla wafer by drowning it in pudding.  And then... they had to bury it in cream.  And - the cream was not sweetened.  Simply weird (in my book).  


The first time I made it - I committed the first of many errors.  I used instant pudding (a big no-no).  Instant pudding didn’t allow the vanilla wafers to absorb the custard-y pudding.  It had to be cook-and-serve pudding.  Check.


The next time I made it - I used too many vanilla wafers.  There has to be just the right amount of cookies in proportion to the amount of pudding you use.  That’s not the end though... I then made it with too MUCH pudding.  I began to see that I couldn’t win at this game.


I also committed the unpardonable sin - layering it with fresh bananas.  After all - isn’t it named “Banana Pudding”?¿!  Fresh bananas are only for those “other” families.

Then I didn’t allow it to refrigerate it overnight.  This is important - as it has to be the correct level of moisture (er...”sogginess”).  That can only be accomplished by giving it a minimum of 8 hours for the cookies to become indistinguishable from pudding.  Check.

The last mistake I made was not covering the pudding when I refrigerated it.  That formed a skin over the cooked pudding and didn’t allow all the moisture to settle into the vanilla wafers.  I was so naive.  

Now, my mistake is not remembering the correct proportion of pudding to cookies.  That is why I’m posting this.  So my kids can make it authentic when they duplicate it in their homes.  

And... one final note - here is how Banana Pudding (in all it’s forms) originated:

First made in the 19th century by Mary Harris Frazer in 1903.  It started out as banana, vanilla custard, vanilla wafers (or ladyfinger biscuits).  After layering those ingredients - it was topped with meringue or whipped cream.  It was layered in either a flat baking dish, or in a trifle bowl.  In all banana pudding versions - it is important to let it rest to allow the “biscuits” to absorb the custard.  It’s made all over the world in different ways, but is most popular in the Southern part of the US.


My kids would protest if I 'decorated' our Banana Pudding this way,
but add your own touches to personalize your version.

Taking Banana Pudding to someone?
Disposable pans make it easy.

For the Petersen version of Banana Pudding - go to:
www.changeabletable.com

Thursday, June 6, 2013

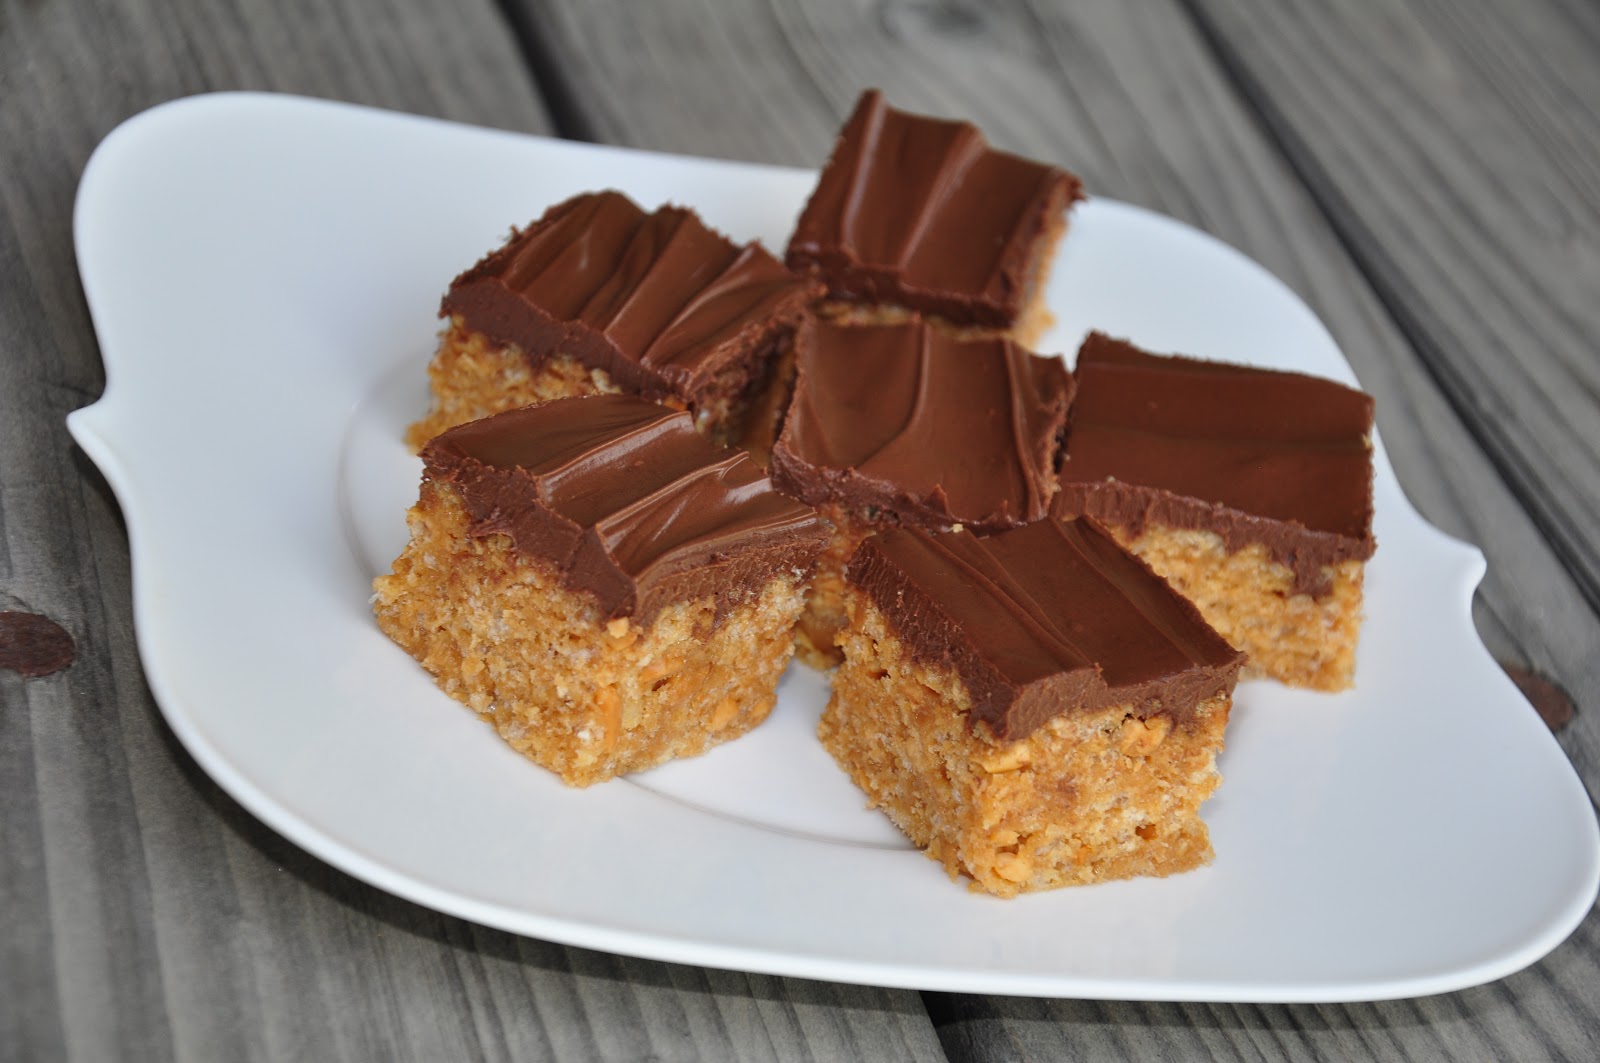
Scotcheroos


Whenever these were found on our kitchen counter, my kids reacted as if Santa had shown up in July.  This has to be one of the top 10 ultimate treats in my family.  If you’ve never tried them (how can that be possible?) - you have a better chance of maintaining your ideal weight (but look at what you miss!)


I’ve tried to add favorites from our past lately because my kids have been reminiscing.  Whenever we get together for any event - I try to make one thing from their childhood years.  This one they have deemed irresistible (and I concur).

Two important family events happened this past weekend - and all my family came to support each other as these ordinances were performed.  One was the blessing of my youngest daughter’s first baby girl, Kate.  We also celebrated the baptism of my 2nd oldest grandchild, Amie.  As always - we had enough food to feed the masses.  


There were just a few of these left in the kitchen as everyone arrived.  It didn’t take long for them to evaporate into thin air.  Some treats are like that - you can’t get enough.


I tried something a little different this time.  I used crunchy peanut butter (because someone accidentally opened “crunchy” when they were looking for “creamy”).  


I added an extra 1/2 cup just to see what happened - and I was pleasantly surprised.  That extra addition of peanuts was fabulous.  It also made them a little less “sticky”- and easier to bite into.


I use a bench scraper to cut these - it makes them look very even and professional.  


The smaller you cut them, the longer they last...

I'm 99.9% sure you will LOVE this recipe, found at:
www.changeabletable.com


Tuesday, May 28, 2013

Easy "Wedding" (Style) White Cake


It’s hard to come up with a pure white cake when you make it from scratch.  All those things that make a made-from-scratch cake delicious will turn the batter yellow (egg yolks, butter, etc...)  This cake - although not white as the driven snow - was more white than any I’ve made before, and it was delicious. 


I have a hard time respecting any recipe made with a boxed cake mix, but I thought this one was worth a chance.  It looked moist and had a fine texture in the photos, so I decided to try it in a set of torte pans I recently bought.


A great white cake plays an understated supporting role in so many desserts.  Without this base layer, you wouldn’t have Boston Cream Pie, Lemon Torte, “Poke” Cake, Strawberry Shortcake, etc...  It isn’t the element that gets noticed as much as the fillings & garnishes - but it’s important that it complements them.


With the additional ingredients in this recipe, you can hardly detect a “cake mix” flavor at all.  I added vanilla and almond extract, and no additional  shortening was added - although it did call for a mere 2 Tbs canola oil.


The cake was really moist and had just a hint of heavenly almond flavor.  With frosting, it is the best white cake I’ve ever had.


I used these torte layers to come up with an over-the-top double chocolate cake.  The white cake layers showcased each type of chocolate very well.  Chocolate ganache in the center, and white chocolate ganache on top - then capped with a yummy chocolate frosting that had the right consistency to flow down the sides of the cake.  


Try this recipe to make about 36 white cupcakes, a 9” x 13” oblong cake, or two 9” or 10” layer cakes.  

You'll find the recipe at:
www.changeabletable.com